Friday, 20 June 2014

Frosts Mora 120 rehandle

This is the first whittling knife I bought. I chose the 120 as opposed to the 106 because back then the longer blade scared me. Let's face it, to the un-initiated these knives look particularly nasty and dangerous - just a step away from a Fairburns-Sykes commando knife. Of course, I've since realized the benefits of a longer blade and so this knife has sat in my carving bag doing nothing.

So, when I saw Ju's recent post about rehandling a Mora I couldn't help thinking it would be a nice little project for my oldest knife.

A couple of years ago my father-in-law gave me a shed. He had bought a new one and so I inherited the one he had bough over thirty years ago, back when they made sheds to last. I had put it up hurriedly without first preparing the ground it was on and over the years it had subsided to the point where I could barely get the door open. Plus, it was at the end of the garden so I had to traipse across a wet and sometimes muddy lawn to get to it and trail an extension lead across the length of the garden if I wanted electricity for the bench grinder, belt sander, pillar drill, lathe, band saw, etc.

So at Easter I made it a priority to move it closer to the house and onto the pebbles where it would be more accessible and better supported - I also put 6ft long 2x6 batons under it. And it worked well and I'm very happy to have a dry, straight workshop in which to do little jobs again. I have made many knives in this shed, both with bought blades and blades I have made myself, but this is the first knife I have worked on since movingd it.

It's a simple design, which is the way I like my knives. Brass, fibre spacer, leather, reindeer antler, oak burl, leather spacer.
I had a lovely thick bit of brass for the bolster, but it's been a while since making a knife and I have lost the knack of drilling a slot that fits the blade snuggly and I ending up have four attempts and wasting it all before giving up and settling for something thinner.


It's a good length for me and fits in my hand comfortably.

Ju gave me the slice of oak burl some time ago - I think he got it from a car boot - and while the figuring isn't very great, It's still a nice piece of wood.

There were a few cracks in the oak which I filled with apoxy resin.

 I put a simple chamfer on the end of the handle - looks ok and stops chipping where there would otherwise be a sharp angle.
Not the most beautiful knife, perhaps, but unique and works well. I really enjoyed this little bit of knife making and will definitely do more in the summer holidays. I really enjoyed the smell of the sanded oak and found I had even missed the smell of sanded antler!

Saturday, 14 June 2014

We really want to see those fingers


Excuse the obscure Vic and Bob quote. I made a new discovery yesterday with my axe work which involves Peter pointer. I haven't carved a spoon for too long (about 8 months), partly due to ill health, but I'm much better now and so I decided to pick up my axe. I very quickly realised that I was feeling pretty weak having not swung an axe for so long. I decided that I needed to get as much done with my axe as possible, both to save time carving, but also to work on my out of practice technique. When doing fine work with the axe I always choke up with my hand as close to the axe head as possible. Yesterday, for some unknown reason I extended my pointing finger along the side of the axe head. I wouldn't be surprised to find that most carvers already do this and if any are reading this then they may well be rolling their eyes, but it was a bit of a eureka moment for me as this gave me much more control.

I'm sure I read or watched Chris Schwarz talking about extending your pointing finger whilst sawing. I think that he said it was a cue to your brain and helped you to saw straight. I think it may have been on an episode of The Woodwright's Shop. Anyway, I think it had the same kind of effect for me whilst hewing and I certainly felt that it gave me more control. It also puts part of my hand behind the   axe head, which adds to the control.


Then I thought about my Svante Djarv little Viking axe and the groove it has along the back of the head. With my pointer extended and my thumb resting comfortably along the groove, I can bear down with my thumb (rather than swinging the axe) and do small, but very precise cuts.


Like I say, I'm sure this is old hat to most of my fellow axe wielders, but it's been a revolution to me.

To the Virgins, to make much of Time

It's Friday, it's been a long hard week of children being hot and irritable and when all I need is a weekend of rest, relaxation, some family time, some me time and, of course, a little bit of whittling, I came home this evening in the full knowledge that all of the weekend was going to be spent writing end of year reports, a job which as yet I haven't started but which needs to be finished and printed off and given to the head-teacher on Monday. It would be an understatement to say I was feeling cheesed off and more than a little sorry for myself.

But then I sat down for a few minutes with my ipad, just to catch up on my favourite blogs and I went to Alexander Yerks' website 'The Axe is Bold as Love' and felt completely lifted and inspired.

http://www.theaxeisboldaslove.com/

For those who haven't come across Alexander, he is a photographer, musician, film maker and carver who makes some lovely spoons and especially nice kuksas and a bit of a philosopher/dreamer who is 'dedicated to all things wooden'.

After just a few minutes looking at Alexander's beautiful photographs and carvings and reading a couple of his posts, expressing his irrepressible enthusiasm for carving and those who do it, I just knew I wasn't going to go to bed tonight before carving a spoon. So, at about 9:30, as the light was beginning to fade and when any sensible person would be packing away their tools, I got mine out, sat on the low wooden wall in my back garden and began to carve. And I was reminded once more of the rejuvenating effects of being outside, wood in my hand, an axe, a knife, the Fleet Foxes playing on my phone (to me the Fleet Foxes are the musical equivalent of the Foxfire books and the backing track to a lot of my carving) and I felt once more connected to that extended family of carvers who I know are all around the world, who understand the need to carve spoons without me having to explain it to them and who I knew were probably carving along with me at the self same time.

I made a spoon, a large cooking spoon.


It's not one of my best (nor are the photos!!); it's a bit rustic; the bowl is a bit too thin in one spot; I will leave it tooled and undecorated. I won't sell it or give it away - I will oil it and it will live in the stoneware pot on my kitchen window-sill and I will use it, cook with it, serve food with it and each time I do, it will remind me that there are more important things in life than end of year reports and that I should take Robert Herrick's advice and gather rosebuds while I can.

Thank you Alexander Yerks.

Tuesday, 10 June 2014

Look after your tools


I like to keep my carving tools in a roll. I made this a few years ago out of canvas. It's nothing fancy and I don't claim to have any skill with a sewing machine, but it does the job, or at least it used to.


As you can see, my tool collection has outgrown the roll. I could get rid of some of my tools (yeah right), or I could make a new one with a few more pockets to accommodate all of my knives (plus a few extra, it's called future proofing). For this new one I quite like the idea of making it out of thin leather. A while back I got myself a sewing machine, not just any sewing machine though, this one is made by Husqvarna. Husqvarna make chainsaws, so I reckon that makes this a very manly sewing machine.


Having never sewn leather before I didn't want to run the risk of ruining a big piece, so I thought I would practice by doing a small roll that will hold just two knives. This is something I've been meaning to do for a while so that if I'm away from home I can take a little spoon carving set with me. This is what I came up with.


I'll confess it was more difficult than I anticipated. The leather, part of an old jacket, was a bit stretchy  and when the grain sides (the shiny sides) were together, there was a bit of slippage. I got there in the end though.


Whilst on the subject of tool protection I thought that I might as well post some pictures of my sheaths. My regular knives all have Birch Bark sheaths. I learned how to make these from Del Stubb's  website. There is a link here. The two on the right were made at the first Spoonfest under the tutelage of Jarrod StoneDahl. The one second from the left came with the knife I bought from Magnus Sundelin.

My spoon knives are all protected with a leather wrap. I first saw this method on the knife that I bought from Ben Orford. I think that all of his spoon knives come like that. It's just a strip of leather, but it works very well and has never fallen off.


I decided to be a bit fancy with the one on the left and do something like the method shown in Wille Sundqvist's book Swedish Carving Techniques. It's still a leather wrap, but includes a little bit of sewing.

Sunday, 8 June 2014

Turning again


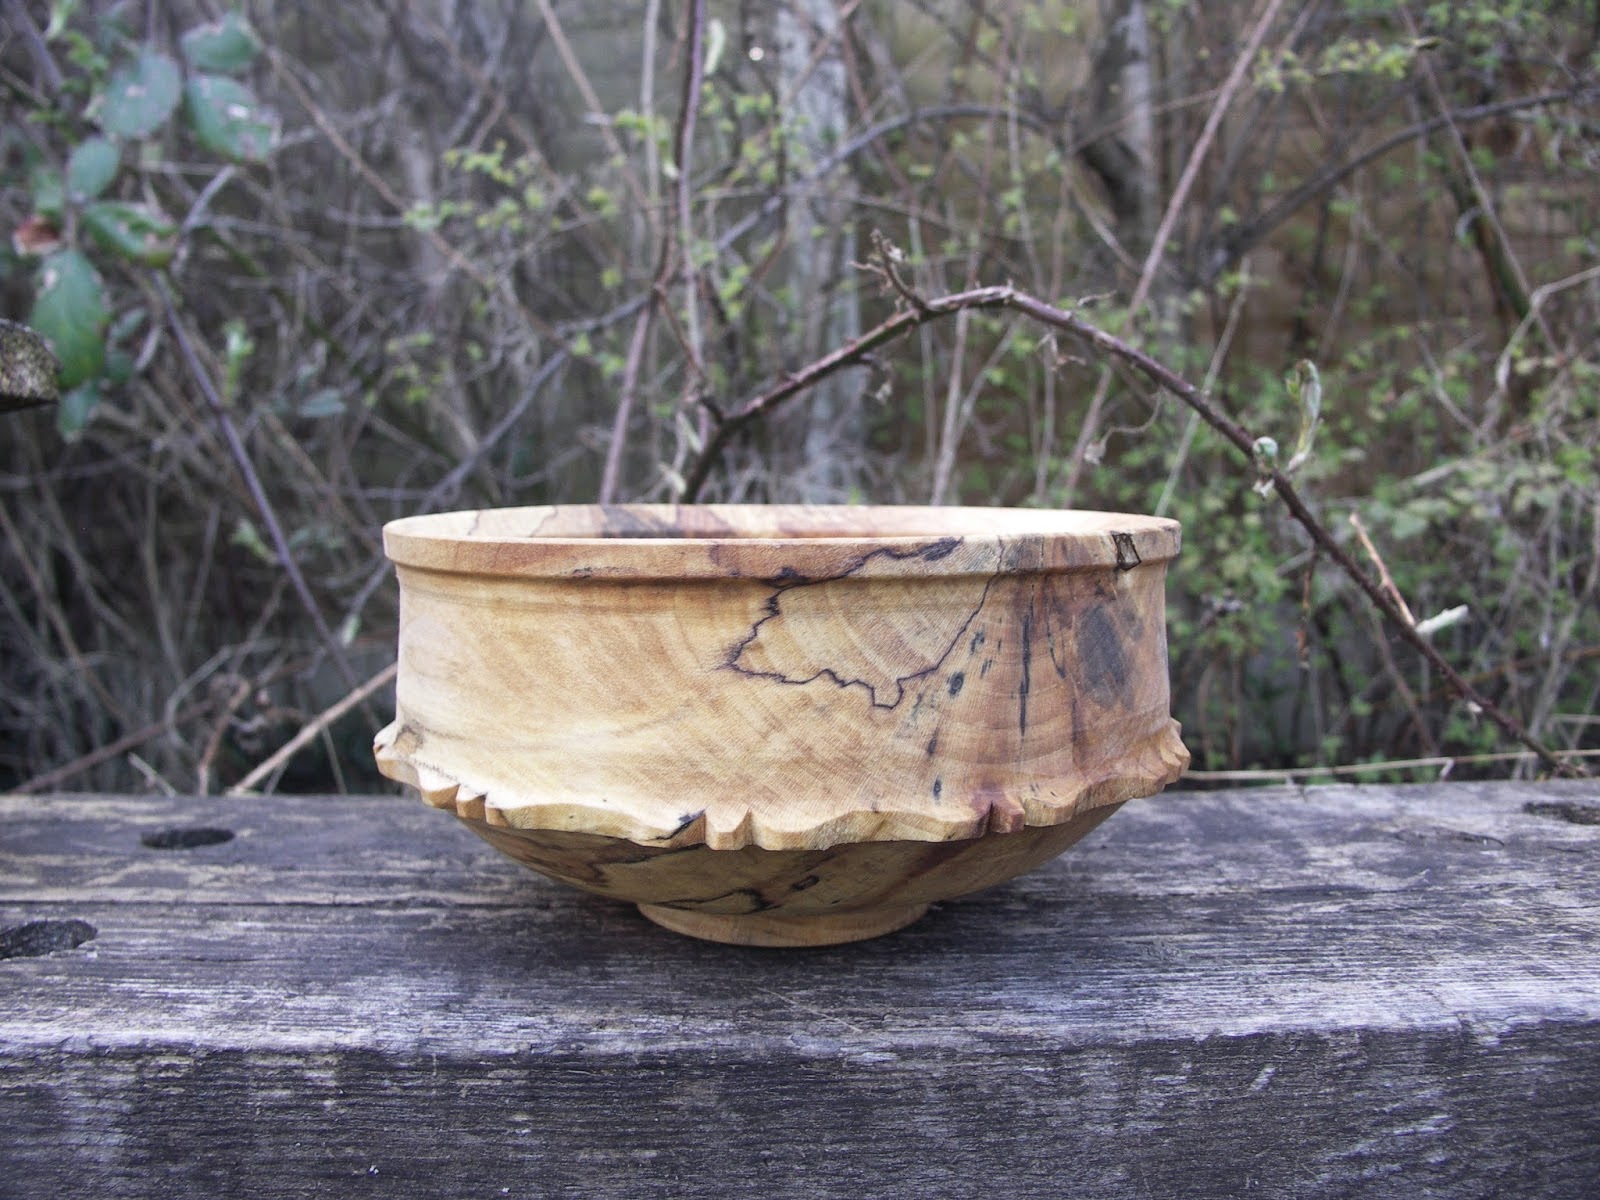
This week I was feeling well enough to turn my first bowl in a few months. I'd actually started turning it before I fell ill and had managed to finish the outside. When I got back to it it had cracked and so I had to change the shape completely (I wanted to salvage this lovely spalted wood).


If I'm honest, I'm not that keen on the shape and I'm not really happy with the carved decoration nearest to the top, but I do like the decoration nearest the base and I think that it is something that I'd like to do more of. I did something similar with this bowl I turned previously-


I can't take any credit for that type of carving, my inspiration comes from Jim Sannerud (though he clearly does it much better). Here is an example of one of his bowls-


Check out his website here. Robin Wood has also just put out a blog post about an old Swedish bowl that he saw whilst running a bowl turning course at the North House Folk School in America. It includes a similar type of carved decoration, so it looks like it might be quite a traditional style. This is a picture of the original bowl-


It belongs to Roger Abrahamson, another fantastic turner. Check out Robin Wood's blog post here for a great read and some pictures of similar bowls made by Robin and Roger. And Roger Abrahmson's website is here.

Overall I'm just happy to be turning again and look forward to making many more bowls in the hopefully near future.

Saturday, 7 June 2014

I Love Wood....


I know I am not alone in these feelings, but I love wood. I actually quite like trees, and whilst I have fantasized about another life where I am a lumber jack, a tree surgeon or a forest ranger, I'm not convinced I could actually bring myself to fell a really beautiful tree, even if it was for the general good of the woodland. But I really love wood: the smell (I often catch my wife from the corner of my eye, laughing at me whilst I sniff a freshly hewn piece of wood), the smoothness and pattern of a piece of newly axed wood, the bark, the different colours and grain patterns, the unpredictability when working each different piece, etc, etc. I was thinking about this when working a piece of birch this weekend - I hope I never take this for granted or let the act of carving become so common-place that I can't see the wood for the trees, so to speak.

So, I made the fatal mistake of having a quick brouse of carving blogs when I got home on Friday night and that's all it took to turn my best intentions of report writing to the compulsion to carve a spoon. And here it is.

It's birch and medium sized - a bit bigger than I usually make eating spoons but smaller than a serving spoon. This is the first spoon I've done using my new Del Stubbs left handed hook. I tried to do it left handed at first but found it too difficult - maybe in time with a little practise - but managed quite well using my right hand and pushing instead of pulling the blade. It definitely made the job easier, and will only become more efficient with time..

Relief carved and kolrossed basket weave pattern, coloured with gravy!!


I'm quite pleased with the final finish of the bowl, having spent a while with my knife trying to get as smooth a finish as possible whilst it still being tooled. I don't always get as good a finish as other people achieve, and I'm sure its largely down to my laziness in not keeping my tools razor sharp.

I really like this double cranked handle - it's not the easiest thing to do, but makes the handle not only interesting but very nice to hold. I've done it before, and always used my hooked knife across the grain of the handle to achieve the rear sweep, but this time used my axe, coming at it from either direction, making it very difficult to get a smooth transition from one plane to the other, where two lots of end grain meet. Fortunately you can't see it now that it's decorated.

Sunday, 1 June 2014

End of the holidays

Well, it's the last day of the half-term holidays and I don't have a lot to show for it, but Ju says I need to post more often, so here goes.

Firstly, I was lucky a week or so ago to get a new axe. It's a common enough axe - a Gransfors Bruks Swedish carving axe with the carved handle - probably one of the most popular amongst the greenwood carving community, but it would usually cost more than I would want to pay for an axe. Especially as I already have a perfectly good Nic Westermann carving axe that was given to me when I left my last job. This particular axe became available from a chap on Bushcraft UK who, after a nasty accident with an axe, decided he didn't want to use it and so sold it for less than half the retail price.
I was interested to see how it worked compared to my other axes so had a go at a couple of spoons - neither of which I actually love, but I guess I'm out of practise at the moment.


All in all I'm happy with the axe. It weighs about the same as the Nic Westermann axe, so felt pretty good. It's no sharper, but due to the offset grind, it has a tendency to bite deeper when carving, so I had to make a conscious effort to not let it, but I soon got used to that. A good addition to my carving bag.
 
I also got his rather nice Del Stubbs left-handed spoon knife from Ju for my birthday.


I haven't had a go with it properly yet, but I'm hoping it will make carving a spoon bowl a little easier.

Here is another eating spoon a did in the week. I've tried this 'spades' shaped bowl before and thought I'd try it again - it works really well for a shallow bowl. It's made from a straight grained piece of cherry so I cranked it myself - I shouldn't really as it supposedly makes the spoon weaker, and I have had them delaminate in the past, but I just love them heavily cranked.


And lastly, whilst these are not new (I made them a year or so ago) I thought I do a quick review on my handmade knife sheaths. When I bought my first Mora carving knives I was concerned that they only came in those cheap plastic sheaths that fall off really easily. If that knife is in your bag and reach in to get it, only to find the plastic sheath has fallen off, you are most likely going to find out the hard way - and those knives are sharp!! So I made these:

It's thick veg tanned leather - a bugger to stitch, but like iron once it is cased. They work really well, I just don't know if I can face doing it again for new knives.