Sunday 24 March 2013

Grinling Gibbons - genius.....

For a long time now I've fantasized about being able to do 'proper' woodwork, you know, a bit of joinery, maybe some furniture, that kind of thing. I love looking at the amazing work Peter Follansbee does and I toy with the idea of buying some wood chisels and booking myself onto a wood carving course, but like most of my high intentions, they fall on rather stoney, infertile soil and I blame lack of time or money or both instead of apathy.

I can be a bit of a prima donna when it comes to achievement. Take the time I first listened to the 16 year old Robin Pecknold sing his St Vincent Street EP, I simply cried and asked, "what is the point in ever writing a song - I can never top that?" Well, just imagine how I felt then when I watched the BBC documentary about Grinling Gibbons.

I had heard of Gibbons but knew very little about him or his work but after seeing some of his incredible, unbelievable carvings I feel like putting away my tools and never looking at a piece of wood again. You just need to watch it folks.


I am a huge fan of trompe l'oeil type painting (the technique involving realistic imagery in order to create the optical illusion that the depicted objects exist in three dimensions) and can really admire and appreciate the skill that goes into producing this kind of art. Well, Gibbons takes this conceit to its limit - watch the show and just look at the cravat he carved, imitating needle lace from wood - just amazing!!


http://www.bbc.co.uk/iplayer/episode/b01pyfd2/Carved_with_Love_The_Genius_of_British_Woodwork_The_Glorious_Grinling_Gibbons/

I'm not sure how I missed this documentary, I guess the BBC didn't advertise it very well, but I stumbled across it by accident while browsing iplayer. If you have an interest in wood work, carving, art, history or just beautiful things, it's a must see. But be quick, it ony has 6 days left.

Saturday 23 March 2013

New spoons and natural pigments

i did a bit of spoon carving for the first time in a while the other day. i was given a sycamore log from my father in law, so i decided that I would carve four spoons, one from each quarter of the log. i decided to follow Robin wood's advice and try to copy a spoon that i like. I also listened to what Richard said to me about working from a card template.

i don't carve anywhere near as much as I would like to, so it was great to carve a spoon a day and each one being in the same style. I feel like I really learned a lot.


I used my Stefan Ronnqvist axe to rough them out. The wood was surprisingly hard and so I wanted to get as much done with the axe as possible. This is a fantastic axe, very versatile. I need to do a separate post dedicated to it soon, but I want to spend a bit more time with it first.


This is the four spoons finished and the Jarrod Stonedahl spoon on the left that I tried to copy. Mine are definitely not as slender as Jarrod's, I chickened out a bit and left the neck a bit thicker. Overall I'm quite pleased with them, as I said earlier, I learned a lot and I like the fact that they are a set all from the same log. My biggest problem is that sycamore is such a dull wood. As you can see in this next picture, they really are quite plain.


So I decided that I would have a go at painting them like the original I was copying from. I bought some earth pigments from a re-enactors market and mixed up some egg and linseed oil paint.


To be honest I wasn't very impressed. I don't know whether I need to grind them up some more, but they just didn't really work for me. I like the un-even finish you get with this type of paint, but with some of them it was really difficult to get some decent coverage. The colour didn't seem to fix as well either and was still rubbing off a couple of days later.


I think that I need to see this as an experiment and it may be that I'll end up painting over them again at some point. If you're having more success than me with painting your spoons then I would love to get some advice, especially on what types of pigment you use. Just leave a comment.


Sunday 17 March 2013

Getting a rough outline.....

Before I was a teacher, I worked for five years as a draftsman in a drawing office. Prior to that I'd attended art school and during those years I learnt a lot about my particular methods and styles of drawing. I learnt very quickly that, whilst I was quite happy sketching, ultimately I wanted a single final, finished line to whatever I drew. This has been the case for much of what I have done asthetically and visually ever since - I simply can't sketch and make things up as I go along (I admire people who can), but instead plan and settle on what the end product will be, right from the beginning.
 
Now, I don't know if all that makes sense to anyone but me, but it has some bearing on the way I carve spoons. I know people who will take a nice piece of greenwood and slowly begin to uncover and reveal the spoon within, simply 'sketching' away with their knives, whittling a little here and a little there until a beautiful spoon emerges. Again, I admire these people but for now, that's not the way I do it. I browse spoons on the internet; I settle on the one I want to make; I make a paper outline then transfer it to cereal box card; I cut out the card and use it as a stencil to mark the outline onto my work. And nine times out of ten, that seems to work for.
 
So I thought I'd show you my growing template book.
 
 
As you can see, it's nothing special - an old ring binder, cut up and put back together with gaffer tape. It's a little under A4; a little over A5 in size and fits quite nicely into my tool bag so that I have it with me whenever I am carving.
 
Inside I have two 'pockets' - one for sandpaper, which otherwise always ends up all curled and unusuable in the bottom of my bag, and one for my cardboard templates.
 
I made it with top flaps so that I could hold the templates without them falling out in my bag, but still be able to get them in and out without bending or tearing them too much. It's a system that works really well, especially for those like me who like to have a template to work to, and when one begins to get worn out, I simply draw round it and make another.
 
Here are a few spoons I've made recently, with their templates:


Apple disasters....

My mum used to say, "Be careful what you wish for, 'cause you just might get it" - okay, she never said that really, but it makes the introduction of this post sound better if, just for now, we all try to imagine that she did. I've been banging on for months about how I've very little wood to carve and that all I've had since before Christmas is a small stock of increasingly drier ash. Well, last week, my friend Dave from school brought me in a few sections of apple boughs which, though fairly knotty overall, had some good clean sections which were very green and simply begging to be carved. I've seen loads of nice spoons and bowls made of fruit wood and it's always interesting, with nice colours going through the wood. Great!

Unable to wait to get started, that night when I arrived home from school I sawed off a small length of the apple, split it and discarded one side, which seemed to be the side where all the knots and little branches were, and proceeded to carve myself a little spoon. As I mentioned in my previous post, this went well, it was a pleasure to carve and it went without hitch. I added a little decoration yesterday.

Quite a pretty little eating spoon.
Then I decided to put all my eggs into the apple basket, so to speak, and spent the rest of the week carving with this wood. That's when I learnt the truth about applewood (or at least the truth about this particular batch) - it's evil!! Someone who knows more about the properties of different woods might be able to tell me if this is a general apple thing, something that applies to all fruit woods, or simply a one off, but it was a really hard wood to work.

Firstly, just simply trying to split the wood was very difficult - I know this will be due partly to the greenness of the wood, but I tried first with a froe, which simply bounced off the wood every time I struck it, and then continued in this vein even with an axe, which took about 8 or 9 good solid whacks with the mallet to make any inroads. Then, when it did split it was fibrous and splintery and gave a very rough and jagged split.

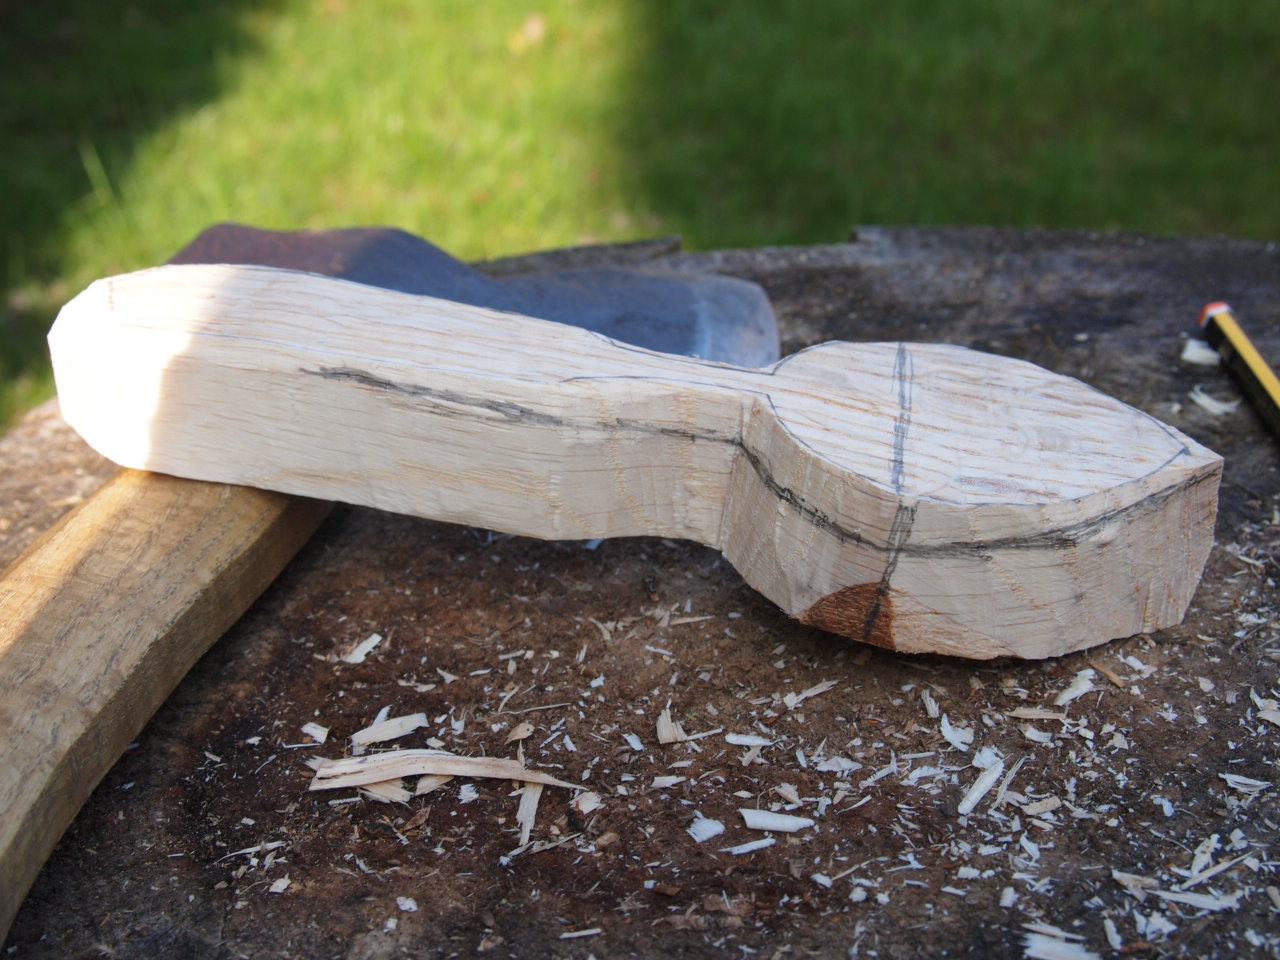
Once split I decided to have a go at a couple of spoons - a dessert spoon sized serving spoon and a large ladle. As I've said previously, I like to start a spoon with as clean and smooth and flat a surface as possible so that I can draw on the outline - well that just wasn't happening.
Just look at the fibres and potential for tear-out on that!
 I tried truing up with my side axe but there was so much tear-out - those pesky applewood fibres are loyal and determined little things, they were not going to give up on each other and clung on, one to the other, regardless of what I tried to do with axe or knife.

Well, to cut a long story short, I had a rather frustrating afternoon. Not only did England loose to Wales at rugby, thus loosing the whole tournament (though I'd have been an idiot to have expected it to go any other way after watching last week's games) but I wrestled and struggled with that wood, firstly to make my ladle, which was okay but lots of hidden knots, swirls and fibre that wanted nothing more than to stand up.
 
Then I got quite a way through my serving spoon, only to discover a crack, that had not been there before, that simply opened up, right across the handle, meaning I had just spent the best part of an hour whittling an elaborate but tiny piece of fire wood!
 
 
Undetered, I went on to carve a second serving spoon but, already frustrated, I rushed it, didn't follow all my own rules and ended up with something that I am not too proud of. I guess I'll leave it a week to dry a bit and see if I can make a silk purse out of it when I'm not quite so wound up.
 
Now I should add here that I am very grateful to Dave for finding me the applewood. Given my time over, I'd no doubt do it all again, and make the same mistakes. I still have quite a bit left and intend to use as much of it as I can, I'll just have to take it easy, that's all.
 

Sunday 10 March 2013

Plane sailing........

As I was hoping the title of this post might suggest, I want to mention planes, but first a little about what I've been up to this week.

Firstly, a friend from school brought in a number of goodies for me this week: another rather nice, straight piece of ash which I will split out and use for spoons; he also gave me an apple branch which I took home, sawed into shorter sections, split and then had a quick go at carving and, oh my goodness, I remember now why we carve GREEN wood whenever we can. It carved beautifully and easily - more like carving soft clay than wood, and in no time at all I'd made a nice, simple teaspoon. Because it was so green I will need to let it dry a bit before finishing, but I can't wait to have a go at another apple spoon next week. I should apologise about the photos - many of them were taken with my phone, hense not great quality.


He also brought me these three green slabs of oak which he had cut with his chainsaw and out of which I will make a seat for my stool. And this brings me onto the subject of planes. I don't have a plane and don't know much about them short of what I've read and don't really know how to use one, however.....

I decided I wanted to make octagonal legs for my oak stool. You may remember, I'd already riven the oak, so yesterday I marked the shape I wanted on the end grain and roughed it into shape with my draw knife, using my shave horse to hold it. Whilst that gave me a reasonable finish, I thought that if I was to plane the surfaces, it might give me a better finish, without the need of sand paper, and a more accurate and controlled finished cut.

I asked at school, in the Design Technology department and was given a Record Number 4 plane that was rusty, dusty and buried in the bottom of a cupboard, since most edged tools have all been risk  assessed out of school work. I took it home, cleaned and sharpened it using a series of grades of wet and dry paper, set it up as best I could using common sense and lo and behold, it worked. And I must say it was very satisfying and I can completely see why some people get obsessive about planes.

The result was a pretty good finish, I think. There was a bit of tear-out where there was a confluence of knots, but I imagine I am using entirely the wrong sort of plane for green wood - if anyone knows I'd love to hear from you.
Roughly shaped with a draw knife
Black and Dekker workmate - not the most satisfactory of holding methods - moves all over the place and in the end I had to stand on it, hook my leg around one of the extending arms, and plane at the same time in order for it to stay still.

Finished leg - all in all pretty good, I thought.

A little tear-out, but nothing to worry about

And the shavings looked great in the fire.

Next, I think I'll have a go with the cabinet maker's scrapper that Julian gave me ages ago and that I've not gotten round to trying yet.

I also had a go at customizing one of my frosts carving knives - the top one in the picture. I'd had a go at the lower one previously and was quite pleased with it and so thought I'd personalize another.


I also carved another of my set of ash eating spoons - that brings me to a total of three now - half way there.
I lent my carving bag to my friend at school, knowing that I would be using the draw knife predominantly, and that he would enjoy having a go at green wood carving. This meant I didn't have my number one axe and had to use this little wetterlings axe instead. It was okay, but not a patch on my kent pattern axe - far too light in the head and because the head is quite small and thin, it glanced off the wood a lot. I'd bought the axe some years ago when I wanted a bushcraft axe, wanted one of the known brands and couldn't afford anything bigger. I guess it's good for kindling, but I wouldn't recommend it for anything more detailed or delicate.
I say it's a Wetterlings axe, but now I look on line, I can't actually find it.

And lastly, a word of advice: it's probably best not to carve and watch the rugby at the same time - I'm lucky this slip was while I was using a knife and not an axe!
Ouch!

Saturday 2 March 2013

How to carve a spoon......

I'm posting this at Julian's request as he was interested to see the method that I employ when carving a spoon. Of course, there are plenty of other methods, plenty of excellent spoon carvers who run workshops if you were interested - have a look on Robin Woods blog as he recently listed a number of such courses - but if you are interested in how I do it, read on.

I am in the process of carving a set of ash eating spoons (my intention is to do six, but if I run out of wood it might only be four). I carved the first one and then made a photo-record of how I made the second - here it is.

 STEP ONE: I always think it best if you can cut your block to as close a size as you are going to need - the more excess material you remove now, the less to remove later. Whilst you can't see it on the photo, this includes the thickness of your wood - this piece is only fractionally thicker than the finished spoon will be. I also think it's good to 'true-up' your wood - nice smooth surfaces for drawing your spoon on. For this I use my customized side axe - about £5 from B&Q and it works brilliantly.

Obviously, the spoon in the picture is the one I've already carved - just there for reference.

 STEP TWO: I swear by cardboard templates. I draw them first onto folded paper to ensure they are perfectly symetrical, then onto cereal box card. Card is both robust but flexible, which as you will see later is esential.


 STEP THREE: rough out the spoon as much as you can with your axe. The more you practise this, the closer to the pencil lines you'll be able to get. When it comes to this kind of carving, your axe is your best friend. Removing material with an axe is quicker and easier than with a knife so keep at it.


 STEP FOUR: next draw a pencil line across the bowl of the spoon at it's widest point - this is where the two angles of the spoon will meet. This is one of the most important things I have learnt regarding the structure of spoons. Before I did it this way I had the angles meet at the spot where the bowl and stem meet, which is okay but to my way of thinking gives you something not unlike a golf club in looks.

At this point you can also draw the shape you are hoping for on the side of the block. I don't usually do this, unless, as in this case, I am trying to match an exisiting spoon. Again using the axe carefully remove the material, carving first from the handle down to the line on the bowl, then in the opposite direction, from the tip of the bowl to the line. This bit takes care as you have very little to hold and your fingers will be very close to your axe cuts. You can see on the last picture, that the new spoon has the same degree of crank as the original spoon.

 STEP FIVE: draw the outline back onto the newly cranked top surface. I've seen people carve spoons just as I have described but missed out this next step and often what they end up with is a fat, altogether less elegant version of the original. It's at this step that the cardboard template being flexible comes in handy as the surface is no longer flat. My rule of thumb is this, whenever you remove the outline, draw it back on.

 
 STEP SIX: I now use the axe to begin to roughly shape the back of the bowl.

 STEP SEVEN: Then use the axe to shape the back of the handle. Again, you can put pencil lines to show the desired thickness of the handle.


 STEP EIGHT: Now comes the knife work. First I take the outline up to the pencil line all the way round.


STEP NINE: I then do final fine carving with the knife, on the back of the bowl and handle, thining the stem and shaping the back end of the bowl.

 STEP TEN: draw a line around the edge of the bowl to ensure you don't hollow out too close to the edge. Then, with a hooked knife, carve out the bowl of the spoon. Be careful not to go too deep - an eating spoon needs to be fairly shallow to work well.


And there you have your completed spoon. I will pass some sand paper over the back and inside of the bowl as these will be used, but they're pretty smooth as they are. A finishing knife would mean you don't need sand paper -  I was hoping to get one of Robin Woods' knives but I guess we just weren't quick enough. Maybe next time.