Saturday 24 August 2013

Best laid plans...

A neighbour had given me the trunk of a small ornamental tree he had cut down in his back garden. I didn't see it with foliage (not that that would necessarily of helped me) so didn't know what it was but it was dark and I guessed it might be a bit different from the woods I usually use.
 First I cut it in half - the thickest end was very knotted so figured I would get the best spoons out of the top half.
Then I cut it into the individual sections I thought I could use for spoons - three crooks and a straight section.
Then with axe and beadle I split the sections into spoons blanks - I reckoned I could get 6 spoons of varying sizes and varieties. I was very pleased as I don't often get good crooks and so don't have a lot of experience of these types of spoons and was looking forward to making some. Needless to say, I got to work on my first laddle, only to find that, before I had even really roughed it out it had started to split! Damn!
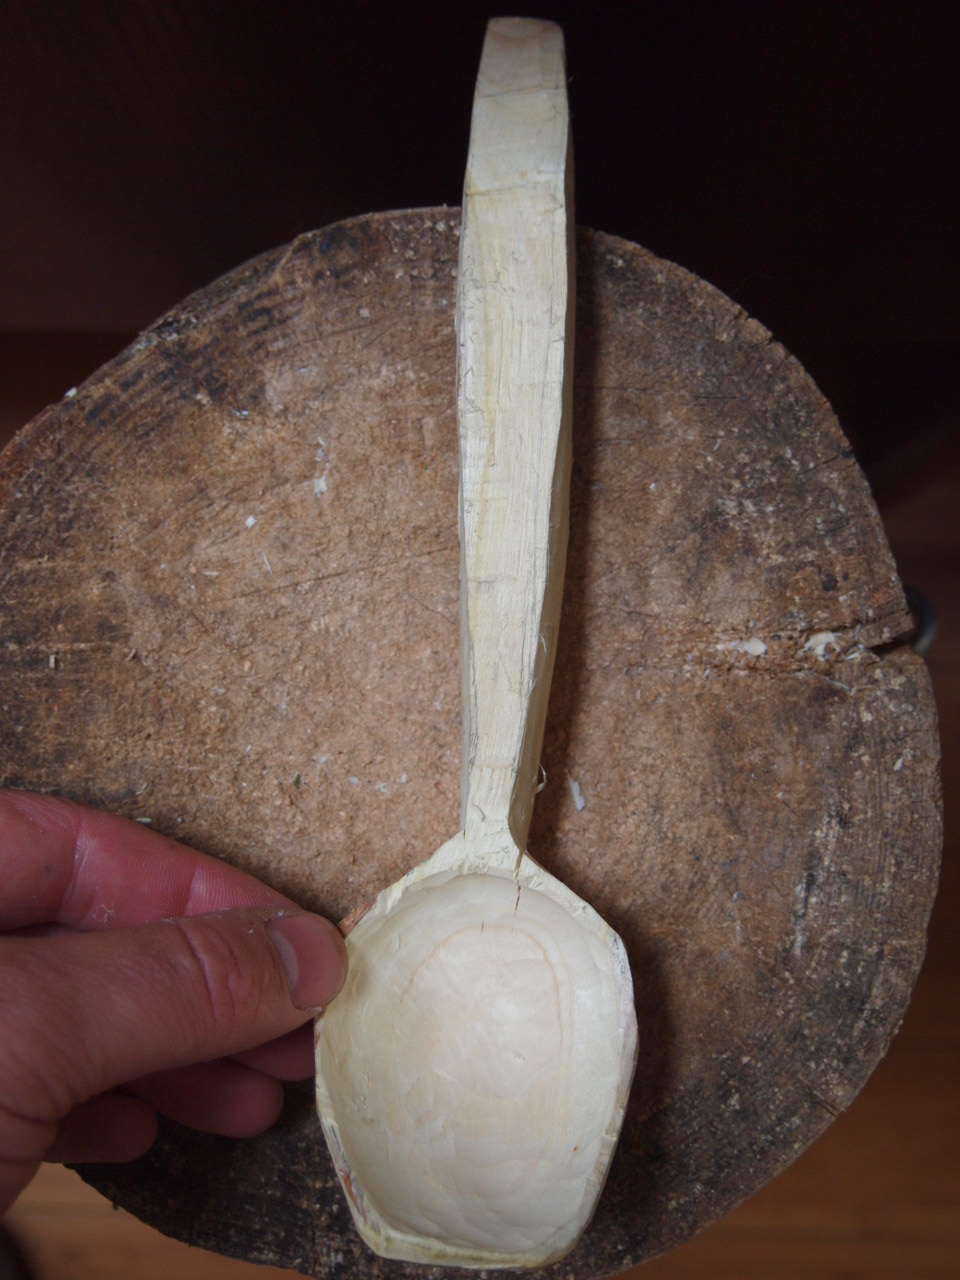
See the crack coming down from the handle into the bowl of the spoon. I roughly hollowed the bowl in the hope that it might remove the wetter wood and create some kind of balance, but the crack just kept opening up.

Obviously the handle would have been a lot slimmer, had I continued with it, but you can see the lovely shape it would have been.
Then, to add insult to injury, I try another and it splits in exactly the same place! I spotted it this time before the crack had extended too far so I wrapped it in newspaper to dry out more slowly and will come back to it in a few weeks. Hopefully the crack may even have closed back up by then.

To makemyslef feel a little better I turned to some good old, trustworthy sycamore and carved a spreader and a nice little eating spoon. It went without a hitch, which is just the way I like it. I haven't carved a spreader in well over over a year (I have carved loads in the past) and fancied having a go with my new axe.


These are the main wooden items we use at home - very handy for spreading and cooking with - my wife uses them instead of spatulas - perhaps I should make some of those as well.
 We went to the seaside last Monday. It was a beautiful day so we headed to Sherringham where we mostly sat in the beach marvelling over the beauty of one pebble after another - in fact every stone we picked up was our new favourite.

I found this brilliant book in a charity shop, which made my day.
It is a great old book, published in '68 - the year I was born - covering a wide range of traditional crafts. It doesn't go into too much detail - you would struggle to learn a craft from this book - but it gives a nice overview of each craft and its history and would be helpful if you already had some knowledge.

The chapters are as follows:

Woodland and Coppice Industries
Felling
Conversion
Pit Sawing
Making Gates and Wattle Hurdles
Making Walking Sticks
Making Rakes, Scythe-snaiths, Forks
Making Helves, Yokes, Shovels, Peels and Flails
Making Besoms
Making Fencing, Clapboards and Shingles
Making Clogs
Charcoal-burning

Carpentry
Chair-bodging
Making Windsor Chairs
Farriery
Wrought-iron Work
Wheelwrighting
Millwrighting
Thatching
Wood-carving
Wood-turning
Weaving
Bow-and-arrow Making
Making Coracles
Pottery
Hedge-laying
Dry-stone Walling
Making Baskets and Traps
Saddlery and Harness-making
Horn-work
Making Corn-dollies
Flint-knapping
Coopering
Pillow-lace Making
Quilting
Making Highland Bagpipes
Timber
Making Briar-pipes
Further Reading

Quite a collection of crafts and skills. And I love the illustrations - here are just a few:
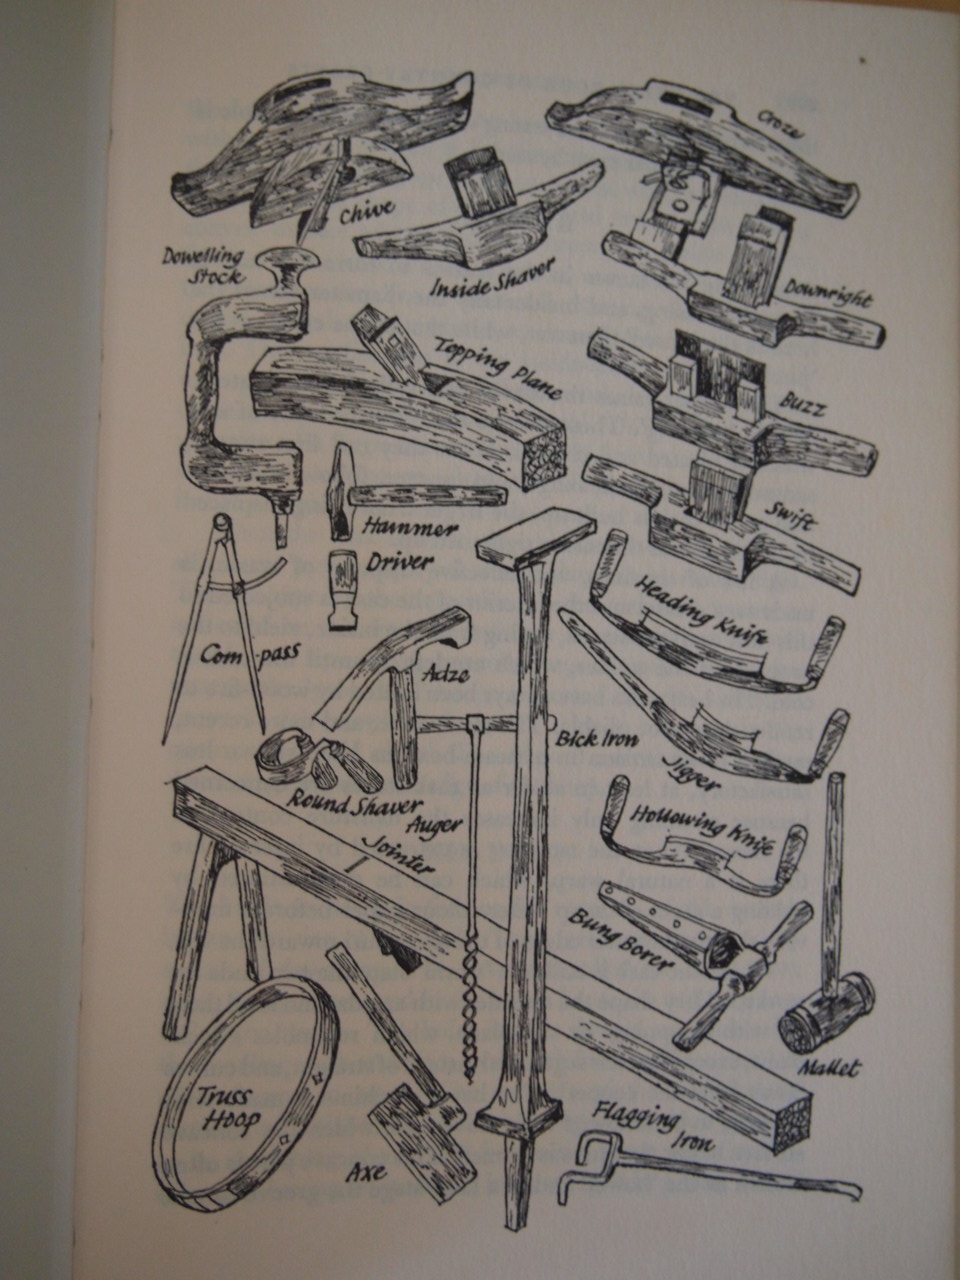


Coopering tools


I look forward to seeing if Ican track down some of the books in the Further Reading section.
 
While I know this is something of a contentious issue, I thought I would just include the opening paragraphs of the chapter entitled 'Craftsmanship' under the side heading 'Definitions':
 
"What is a craftsman? He or she who, broadly speaking, makes things individually by hand, using only such tools and appliences which are manipulated. With a few exceptions, these tools are quite simple in themselves, and in many cases are little more than perfections of the original tool of centuries ago. A craftsman is usually the designer of the thing he is making, but in some practices there may be a mutual division of operations, though not tothe extent that one person is isolated from the other or is not concerned with what the other is doing. In fact, an important feature is the close co-operation.
 
A craftsman may be an individaul working alone, such as a hedge-layer, or he may be one of a team or a unit, such as a wheelwright. Where design and execution do happen to be divided between two or more persons, there must be the closest co-operation. The situation whereby the designer and the executant do not meet is unknown.
 
A craftsman makes things by hand, one at a time, and can therefore impart an individuality in each product according to his or her own will. In fact, with certain exceptions, one may fairly say that 'no two are alike'."
 
A little food for thought.

Tuesday 13 August 2013

Ouch!


I picked up a couple of Robin Wood's spoon knife blades at Spoonfest, one for me and one for Richard. Richard has already posted on here about his initial thoughts, so I thought I would add some of mine. Having spoken to Robin about these at Spoonfest and also reading posts on his blog, it seems that they are to some extent based on the hooks made by Bo Helgesson. The shape of the curve is similar, incorporating a flatter, more shallow curve as well as a tighter curve at the tip of the blade for more aggressive hollowing.

From Top: Ben Orford, Svante Djarv, Dave Budd, Robin Wood.


Unlike some other hook knives, the blade is not parallel along it's length, rather it tapers from tang to tip (my Svante Djarv and Ben Orford knives both have a very slight taper). When I asked Robin about this, he said that it was to promote more of a slicing cut. He also mentioned that it was for this same reason that the blade sweeps back at an angle to the tang. This is different to all of the other hook knives that I have tried. Unlike my Svante Djarv and Ben Orford hook, but similar to my Dave Budd, Robin's knife has a ricasso, which makes it possible to sharpen the entire length of the blade.


At Spoonfest Robin was selling his hooks either as a blade only or with a handle that he had fitted himself. Though I went for a blade on it's own, I did pay some attention to the handles that Robin had fitted as they were also very different to most hook knives, the significant difference being the length. Both the Svante Djarv and the Ben Orford knives have handles of 4 1/4" in length, Robin's handles were around 10 1/2 ", over twice the length. Again, I asked Robin about this and he explained that the reason behind the long handle is that when he has watched production spoon makers at work, they will usually hollow out the bowl by using the supporting hand as the fulcrum and the long hand becomes a lever. Obviously this allows for a lot of power, and therefore a lot of wood can be removed quickly.


I attempted to take a picture to demonstrate this action, but in a silly and hasty effort to take the picture without a tripod, I knocked the camera off of the stump that I was balancing it on, made a quick move to rescue the camera and sliced off a chunk from the back of my ring finger (when I returned from A&E  I was able to return to the wood pile and locate the missing piece). So, just like Richard, I can attest that the knife comes incredibly sharp. From what I understand, Robin has finished the grind on these knives himself, and they come with an almost mirror polish. this is not aesthetic, it allows the blade to glide through the wood (or your finger) and creates a fine finish on the spoon.


The back of the blade is also ground down, not to a sharp edge, but to round the blade off, preventing the back from fouling the cut and allowing you to make a continuous, curved cut. this shows the attention to detail. The final thing that I noticed was that the handles he has made taper significantly towards the end, but not in every plane, so instead of tapering to a point it is more like a screwdriver tip that is off centre. Unfortunately I didn't pay enough attention to the orientation of this aspect to the blade, and so I was unable to recreate it in my handle with confidence. At first I thought that the purpose of this was to create a sort of thumb rest for a palm up grip, similar to that found on an Indian crooked knife. However, on closer inspection of the two pictures I could find of Robin's handles, it seems to be oriented in a way that would make it impractical for this kind of use. I even looked at the video of Ion Constantin carving a spoon in the hope that it would give some clues, but nothing. So I have concluded that it is just to reduce the weight of the handle. If anyone knows differently then please   enlighten me.

Unfortunately, due to my heavily bandaged finger, I won't have the opportunity to try it out properly for a while, but based on my initial observations, this will be a very versatile and effective hook knife. After all, there are very few people in the world whose experience with this type of tool can compete with Robin Wood's. The great bonus is that at £15 for a blade it is also one of the cheapest hook knives available. In his blog Robin mentions that this batch are still prototypes, so there may even be some further improvements. When the design is finalised, they will be available from his website.

You can check out the hollowing technique I mentioned on the following two videos. If you haven't already seen them, you're in for a treat.


I can't seem to imbed the next film, but you can follow this link: Swedish spoon maker


Sunday 11 August 2013

Another new tool for spoon carving....

No prizes for noticing that this is in fact my microwave and not a conventional woodworking tool. So how is it of use when spoon carving? Well, let me explain. I wanted to carve a spoon yesterday and began with a piece of sycamore which had been knocking around for a bit and had begun to dry out. And I committed one of the cardinal sins of beginning to carve a piece of wood which was not really suitable and should have been discarded before I even began. Why? Because it had dried out on the ends and had some checkering which everyone knows are potential splits. But I ignored this fact and cracked on with my carving.

Thirty minutes of axe work and a little fine carving with a knife later and I realised that the cracks were beginning to open further and were extending into the bowl at one end and of the end of the handle at the other. But I hate to waste thirty minutes of carving and a potential spoon. So, how could I stop the existing splits from opening up any further? I needed to dry out the rest of the spoon in order to creat some degree of equalibrium - I had been lead to believe that splitting often occurs due to the difference in moisture from one part of a piece of wood to another. I had also heard of people drying spoons in a microwave, but that it was an inexact 'science' and you ran a rist of drying the spoon too quickly and it cracking apart. I had nothing to loose, however - if I didn't take the risk, the spoon was going to split anyway.

I gave the spoon 4 lots of 20 seconds on full heat, giving it a few seconds between each blast to cool back down and for the moisture which 'cooking' brings to the surface time to evaporate. It was a little scary at times to open the door of the microwave to hear the spoon itself sizzling and knowing perhaps how close I had come to overcooking and destroying the spoon, but after the 4 sessions it seemed to be ok and the cracks that had been there previously had decreased, if not disappeared altogether.

At this point I hadn't quite finished the spoon so sat in the backgarden to do some fine cleaning up and detail, and was surprised to find just how hard my newly dried spoon was compared to how soft it had been prior to its spell in the microwave. And whilst you may think that this would have been an obvious result of drying out the wood, it was not simply harder, it was bone hard, making it very difficult to carve to any extent but giving lovely clean cuts in the process. Furthermore, if you like your spoons smoothed and sanded, it meant it gave a smooth finish much quicker and without so much effort - a bonus for impatient people like me.
You can't see it so clearly on these photos, but there is a darker patch at the tips of the handle and bowl, where the wood had already begun to dry-out - this is where the checkering was and where it would have split if I hadn't taken drastic measures with the microwave. I am hoping that, as the newly carved wood ages it too will take on this darker colour.

As you can see, I stuck with my new maker's mark, and carving lettering was really sharp in this hardened wood.


And just to demonstrate Julian's dedication to his carving, here is a photo of him at our neice's wedding on Friday - waiting between the service and the reception to be called for photographs and out comes the carving kit and he carries on with a little turned bowl he had made in the morning. And I thought I was being obssessive because I had my most recent spoon in my inside jacket pocket to show him - I had not brought knives or axes with me - they tend to be unwelcome guests at weddings (although I did recently give a handmade knife to a friend who was getting marries as apparently in some traditions it is good luck).
Now that's dedication.

Thursday 8 August 2013

Robin Wood Spoon Knife Review...

Having handled my new spoon knife, bought for £15 from Spoonfest, I was quite keen to carve a spoon and see how well it performed.

Now I should begin by saying I am not an expert nor a consoissuer of spoon knives, having used mostly a bog-standard frosts hook knife and a couple of times Julian's Svante Djarv, so I will be giving a purely subjective opinion of my new knife.

Anyway, perhaps most importantly, my first observation is that the knife is sharp.
I wanted to have a go at making an eating spoon, something a little thinner and more delicate. I had a piece of laburnum so thought I would use that.

Nice and thin with a shallow bowl for easier eating.

Experimenting with a new maker's mark - not sure what I think yet.


As far as the spoon knife is concerned? Brilliant. As I've already said, very sharp from the outset - no extra honing or stropping needed. Cuts clean without chatter. The straight section means you can use the knife for general whittling and trimming.The blade shape fits the concave of the spoon bowl perfectly for a shallower spoon, meaning you can achieve the bowl in a single cut, meaning less smoothing / scraping / sanding needed.

All in all, I really liked the knife and would happily recommend it above a frosts knife. I now would like to get a left handed version to make those reverse cuts a little easier.

Tuesday 6 August 2013

New crook knife....

Well, I might not have managed to get to Spoonfest this year, but I did manage to bag myself a new Robin Wood spoon knife. He had made some before and they had sold out very quickly so when he mentioned in a recent post that he would be selling another batch at Spoonfest, I gave Ju instructions to try and get me one. And he did.


It cost £15, which I thought fairly reasoable - in fact the same price as a Dave Budd hook which I know happen to be really good knives - I look forward to seeing how Robin's Sheffield steel knives compare.

I picked it up from Ju's today - it seems ok, albeit a little irregular, but that wont necessarily adversely affect the performance. Julian had also traced around one of Robin's handles (he was selling the blades pre-handled for £30, which seems a bit steep to me, but then I didn't have to put in the time and effort to handle them) so I thought I'd have a go at doing one similar, I think out of cedar, but I'm not entirely sure. I also made my handle just a fraction longer than Robin's in the hope of being able to use the leverage of the longer handle.


It looks pretty good - I'll give it a whirl tomorrow and see how it does.

I was also chatting with Ju yesterday about the use of stop-cuts in spoon making. When I first started making spoons I always used stop-cuts where the handle meets the spoon in order to prevent over-zealous axe work when trimming the handle from over-shooting into the bowl. As my axe work got better and more accurate, however, I stopped. Until, that is, Jarrod Stonedahl's recent carving video which reminded me that it doesn't make me a better carver if I don't use stop-cuts and that it actually makes my carving more safe and efficient if I do, so now I do.

Then I got to thinking, wouldn't a stop-cut help to solve the over-shooting problem I sometimes have when cranking a spoon? So I thought I'd give it a go and see how it worked out.


Two spoon blanks with stop-cuts at the shoulders and across the bowl for the crank.

A side veiw to show the depth of the stop cut.

The finished spoon.


All in all I would say that for the sake of a 30 second cut with my folding saw, it was actually worth the effort and made the profile cuts just that little easier.

Sunday 4 August 2013

Spoonfest 2013


I stopped explaining to people why I wanted to spend a few days of my summer at a festival dedicated to carving wooden spoons. This was partly because I found it difficult to explain and partly because I just don't think that most people can understand (is that just one thing?), but as soon as I arrived at the site in the beautiful surroundings of Edale, it became clear to me again and it wasn't just about spoons.


The Spoonfest clay oven

Sharif Adams making burnt offerings to the spoon gods
To be completely honest I was a bit nervous about going this year as last year I was with Richard and Eden, two of my brothers. That was the only time that we had spent the weekend together, just the three of us, so we took advantage of it and mostly just hung out together. This time it was just me, so I was anxious about not really knowing anyone. As soon as I got off the train in Edale however, my fears were allayed. I was approached by fellow train passenger Ollie, who asked me if I was going to Spoonfest, and that was it, conversation flowed and I had my first Spoonfest friend. At the local pub whilst Ollie and I were waiting for the gate to open, a group of people approached us and our numbers swelled. I soon realised that an event like this, obviously, attracts a particular type of person and so it was always easy to talk to people. One thing that I soon noticed about this particular type of person (I could probably substitute particular for peculiar) is that they are all so nice. In fact it seems like you have to be nice to carve spoons, there is a law or something. I met so many kind and friendly people. About seven years ago I went to the Reading music festival. It was the first time I had ever been to an event like this, I enjoyed the music, but I was quite disappointed with the atmosphere. I had hoped that it would resemble Woodstock 1969, what I got was more like a football match. I conclude that hippies don't go to music festivals anymore, they carve spoons.

Loads of different species of wood
Unfortunately this year I missed most of Spoonfest as I had to leave early Saturday morning to go to a wedding, but in the short time I attended, there was so much on, that I didn't feel like I missed out too much. Thursday evening began the event with an introduction to all of the instructors and then a talk by TV presenter Adam Hart-Davis. he gave a lovely presentation about his passion for green woodwork, which included a slide of him carving spoons on the train. I think I would be too concerned that I might get arrested for having a knife in a public place, but I think that Adam is more likely to have been arrested for the loud shirt he was wearing, so he probably thought it would be ok. After the presentation the bar opened and the guitars came out around the campfire. That's when I met thoroughly nice chap Tom Dillon, who was happy to share his guitar with me and to share his songs with everyone. His song   In my Caravan is still going round my head, both because it's a lovely song and because he played it about seven times in one evening due to so many requests.

Adam and his amazing technicolor spoon shirt
Friday was my only full day and I was keen to experience as much as I could. I started with a knife course by Steve Tomlin. Steve is a great teacher and though I use all of the grips he showed us, he improved my technique and explained how to use each grip to the best effect. From there I went to the spoon shop, where there was an amazing display of spoons for sale and anyone that wanted to could include their wares. I couldn't resist buying two little eating spoons, one from Sean Hellman and another from Dave Cockcroft. After this I spent some time in the spoon gallery, a great source of inspiration, which included the spoon a day collection by Keith Matthews. Then it was time to watch Fritiof Runhall in the spoon chair where he had an hour to demonstrate the way he carves. This was followed for me by a demonstration by Jarrod Stonedahl on how to axe out a spoon blank. I'd watched the video he'd produced on his blog, but I learned much more from seeing him do it in person, hearing his commentary and asking questions.

Fritioff in the spoon chair
Adam and Fritioff are competing for the most interestingly dressed spoon carver. Fritioff borrowed this little number from Rod, Jane and Freddy
This post is getting really long so I'll just say that as well as just talking to people and asking questions (everyone was very approachable, including the instructors)  I watched a blacksmithing demonstration, a leather working demonstration and the highlight of the day, watching Nic Westermann (another tremendously nice chap) forge an axe. The only thing I didn't find time for, ironically,  was carving a spoon. The day finished with more singing around the campfire, several more renditions of Tom's wonderful caravan song and some Harmonica from Robin.

Thanks to Robin, Barn and everyone involved for another fantastic Spoonfest.

Jarrod's axe demonstration


Sean Hellman's work


Not a spoon, but probably my favourite