I'm posting this at Julian's request as he was interested to see the method that I employ when carving a spoon. Of course, there are plenty of other methods, plenty of excellent spoon carvers who run workshops if you were interested - have a look on Robin Woods blog as he recently listed a number of such courses - but if you are interested in how I do it, read on.
I am in the process of carving a set of ash eating spoons (my intention is to do six, but if I run out of wood it might only be four). I carved the first one and then made a photo-record of how I made the second - here it is.
STEP ONE: I always think it best if you can cut your block to as close a size as you are going to need - the more excess material you remove now, the less to remove later. Whilst you can't see it on the photo, this includes the thickness of your wood - this piece is only fractionally thicker than the finished spoon will be. I also think it's good to 'true-up' your wood - nice smooth surfaces for drawing your spoon on. For this I use my customized side axe - about £5 from B&Q and it works brilliantly.
Obviously, the spoon in the picture is the one I've already carved - just there for reference.
STEP TWO: I swear by cardboard templates. I draw them first onto folded paper to ensure they are perfectly symetrical, then onto cereal box card. Card is both robust but flexible, which as you will see later is esential.
STEP THREE: rough out the spoon
as much as you can with your axe. The more you practise this, the closer to the pencil lines you'll be able to get. When it comes to this kind of carving, your axe is your best friend. Removing material with an axe is quicker and easier than with a knife so keep at it.
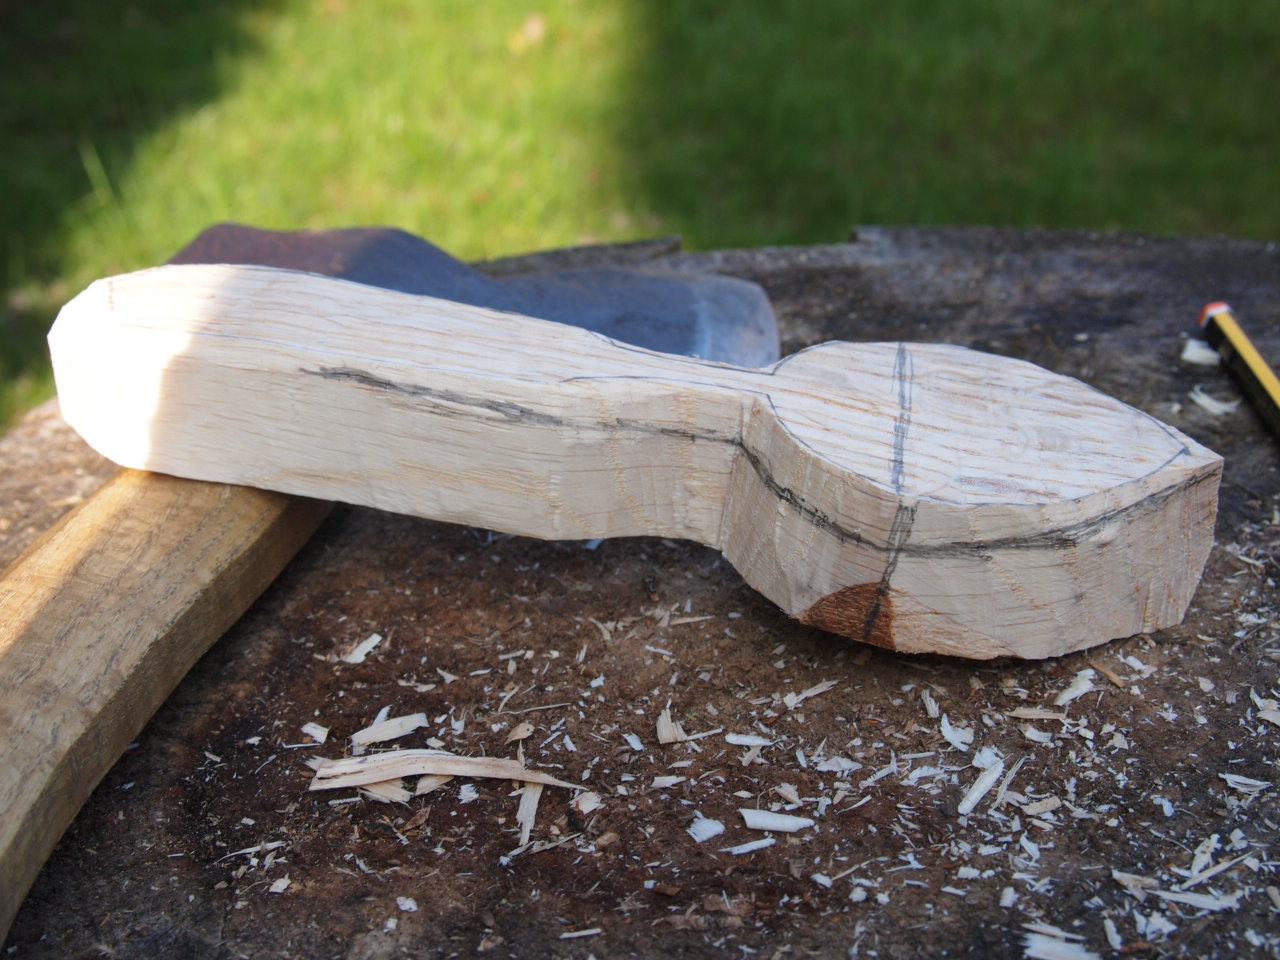
STEP FOUR: next draw a pencil line across the bowl of the spoon at it's widest point - this is where the two angles of the spoon will meet. This is one of the most important things I have learnt regarding the structure of spoons. Before I did it this way I had the angles meet at the spot where the bowl and stem meet, which is okay but to my way of thinking gives you something not unlike a golf club in looks.
At this point you can also draw the shape you are hoping for on the side of the block. I don't usually do this, unless, as in this case, I am trying to match an exisiting spoon. Again using the axe carefully remove the material, carving first from the handle down to the line on the bowl, then in the opposite direction, from the tip of the bowl to the line. This bit takes care as you have very little to hold and your fingers will be very close to your axe cuts. You can see on the last picture, that the new spoon has the same degree of crank as the original spoon.
STEP FIVE: draw the outline back onto the newly cranked top surface. I've seen people carve spoons just as I have described but missed out this next step and often what they end up with is a fat, altogether less elegant version of the original. It's at this step that the cardboard template being flexible comes in handy as the surface is no longer flat. My rule of thumb is this, whenever you remove the outline, draw it back on.
STEP SIX: I now use the axe to begin to roughly shape the back of the bowl.
STEP SEVEN: Then use the axe to shape the back of the handle. Again, you can put pencil lines to show the desired thickness of the handle.
STEP EIGHT: Now comes the knife work. First I take the outline up to the pencil line all the way round.
STEP NINE: I then do final fine carving with the knife, on the back of the bowl and handle, thining the stem and shaping the back end of the bowl.
STEP TEN: draw a line around the edge of the bowl to ensure you don't hollow out too close to the edge. Then, with a hooked knife, carve out the bowl of the spoon. Be careful not to go too deep - an eating spoon needs to be fairly shallow to work well.
And there you have your completed spoon. I will pass some sand paper over the back and inside of the bowl as these will be used, but they're pretty smooth as they are. A finishing knife would mean you don't need sand paper - I was hoping to get one of Robin Woods' knives but I guess we just weren't quick enough. Maybe next time.


No comments:
Post a Comment